News Ticker

Menu

Browsing "Older Posts"

Android Bulk SMS Sender Unlimited -https://www.lantechsoft.com/

Sunday, August 23, 2020 / No Comments


Android Bulk SMS Sender Unlimited

Product Code : LTS-DC1001
  • Sends SMS to multiple phone numbers from PC via Android Phones.
  • "SMS Sender Modem Pro App" is required to Connect Android Phone.
  • Internet Connection Required
  • Compatible with All Android Mobiles.
  • Android Version 6 or Above.

Description

Android Bulk SMS Sender is a multiple SMS sending tool from Multiple Android phones through a single platform at once. You can send Thousands of SMS from your PC through connected Android Phones. You need to install 'SMS Sender Modem Pro' App in your phone to get connected to the Android Bulk SMS Sender. You can import the contact list from the files (excel and text files) on your computer or you can enter contacts manually. You can send SMS to any number recipients without any constraints from the software. Android Bulk SMS Sender allows you to send INTERNATIONAL SMS in BULK with the feature of adding country code as prefix to Mobile Numbers. Android SMS sender also allows you to customize SMS with many fields such as (Mobile Number, Name etc). It allows you to select mobile number out of all connected mobile phones through which you want to send SMS from PC. Android Bulk SMS Sender includes many features such as delay in SMS to be delivered.Android Bulk SMS Sender sends SMS from pc to mobile.

Android Bulk SMS Sender acts as an advanced marketing tool in the market, making it easier to send promotional messages and links. You can send Personalized message to all the contacts. For example, you can add the name of contacts in the message for personal touch.It also keepsa Log file for Sent and Failed SMS with number, corresponding message and Dates of SMS sent. The unique feature of Android Bulk SMS Sender is that itsends SMS to All DND/NON-DND Mobile Numbers. This SMS sending softwaresends SMS to individuals or list of phone numbers. Android Bulk SMS Sender is compatible with both Windows 7 and Windows 10. It only requires you to have the SIM in your phone and No data connection is required for its working. It supports Multi Lingual SMS so that you can send SMS in French, Italian, Japanese, Arabic, Hindi, Gujarati, Urdu, Punjabi, Bengali, Tamil, Telugu, Kannada, Malayalam, German and many Others.

IMPORTANT NOTE: "SMS Sender Modem Pro App" required in the Android Phone.

Key Features

  • Send SMS through Android phones via PC.
  • SMS Cost as you can buy unlimited SMS Packs from Airtel/ Vodafone/Idea and other GSM operators.
  • Send SMS to All DND/NON-DND Mobile Numbers.
  • Send SMS to individuals or list of phone numbers.
  • Load Contact Numbers from File.
  • Send unique or personalized SMS to every Contact using Excel File Data.
  • Send message in many different Languages (Unicode).
  • Add Custom Field value to generate unique SMS for Every Contact.
  • Sent messages can easily be saved and viewed by the user.
  • Compatible with All Android Phones.
  • Internet connection is required to send SMS.

How It Works

How to send Bulk SMS

  • Ensure "SMS Sender Modem Pro App" is installed on Mobile and your mobiles have SMS pack or enough balance to send SMS.
  • Connect your Android Phone With Local Network Using WiFi
  • Open SMS Sender Modem Pro App
  • Set SMS Sender Modem Pro as Default SMS Sending App
  • Selct PC Sync From Top-Right Menu
  • Login With the Same Email as you use in Software
  • An IP is Generated for Connection
  • Start Android Bulk SMS Sender.
  • Click 'Add Android Phones' Button
  • Enter IP Address Displayed in SMS Sender Modem Pro App
  • Click 'Add' Button
  • List of Connected Android Phone is Displayed
  • Add or Import Mobile Numbers of recipients.
  • Apply SMS text.
  • You can also send unique PERSONALIZED SMS for each recipients using Excel Data
 

Conversion Discrete To UMA 90% Testing Over --Raminfotech Laptop service Center

Friday, August 21, 2020 / No Comments

  Sony MBX-267 Conversion Discrete To UMA

Samsung RC510-S04AE Conversion Discrete To UMA

HP 15-Ab027tx DAX11AMB6D0 Rev D Conversion Discrete To UMA


0000000000000000000000000000000000000000000000

Create Windows 10 installation media

/ No Comments
Create Windows 10 installation media To get started, you will first need to have a licence to install Windows 10. You can then download and run the media creation tool. For more information on how to use the tool, see the instructions below.


media creation tool. For more information on how to use the tool, see the instructions below.


Your current edition of WindowsWindows 10 edition
Windows 7 Starter
Windows 7 Home Basic
Windows 7 Home Premium
Windows 7 Professional
Windows 7 Ultimate
Windows 8/8.1
Windows 8.1 with Bing
Windows 8 Pro
Windows 8.1 Pro
Windows 8/8.1 Professional with Media Center
Windows 8/8.1 Single Language
Windows 8 Single Language with Bing
Windows 10 Home
Windows 10 Pro
Windows 10
Windows 8/8.1 Chinese Language Edition
Windows 8 Chinese Language Edition with Bing
Windows 10 Home China​


Before you install Windows 10, it’s a good idea to save any work and back up your PC before you start. If you used the media creation tool to download an ISO file for Windows 10, you’ll need to burn it to a DVD before following these steps.

  1. Attach the USB flash drive or insert the DVD on the PC where you want to install Windows 10.
  2. Restart your PC.

    If your PC does not automatically boot to the USB or DVD media, you might have to open a boot menu or change the boot order in your PC's BIOS or UEFI settings. To open a boot menu or change the boot order, you'll typically need to press a key (such as F2, F12, Delete, or Esc) immediately after you turn on your PC. For instructions on accessing the boot menu or changing the boot order for your PC, check the documentation that came with your PC or go to the manufacturer's website. If you do not see the USB or DVD media device listed within the boot options, you may need to reach out to the PC manufacturer for instructions for temporarily disabling Secure Boot in your BIOS settings.

    If changing the boot menu or order doesn't work, and your PC immediately boots into the OS you want to replace, it is possible the PC had not fully shut down. To ensure the PC fully shuts down, select the power button on the sign-in screen or on the Start menu and select Shut down.

  3. On the Install Windows page, select your language, time, and keyboard preferences, and then select Next.
  4. Select Install Windows.


Complete Guide on How to Unlock Verizon Motorola Moto E (XT1528)

Thursday, August 20, 2020 / No Comments


Unlike AT&T and T-Mobile, Verizon phones operate and connect via a CDMA network, which means it is not configured to work on GSM networks as AT&T and T-Mobile do. If it’s a CDMA phone it’s by default unlocked, however, simply inserting a sim card from AT&T or T-Mobile or any foreign network won’t make it work.

In this guide, we will show you how to reconfigure a CDMA XT1528 to connect to GSM networks so it can be used with any other SIM cards from AT&T, T-Mobile, and even international ones!

There’s a video below that supplements this written guide:


We also supplemented this step by step guide with screenshots to help you along the way. 

Now, let’s get started!

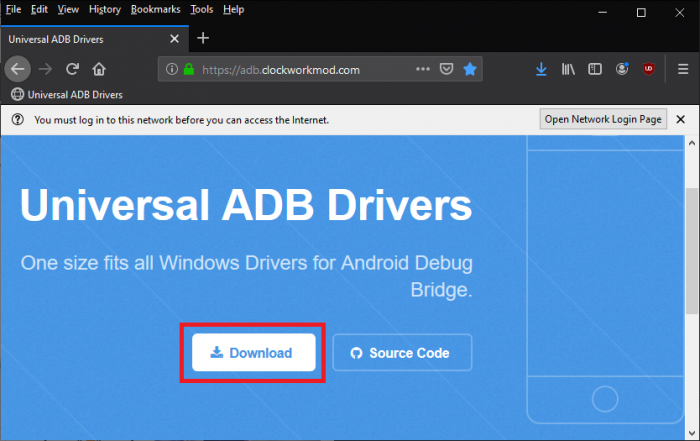
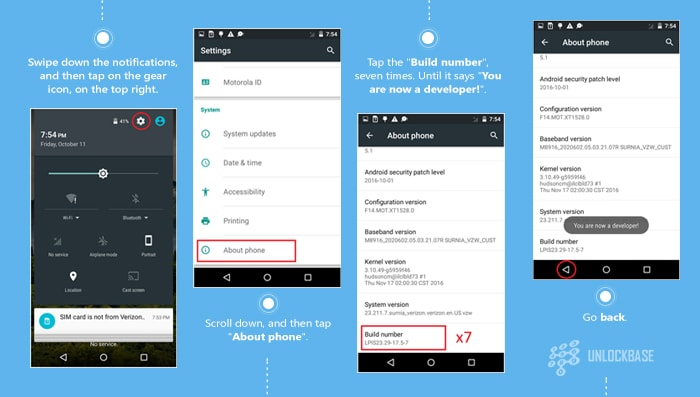
Step 1: Download and install the universal ADB drivers from this website (Clockworkmod). Note: the universal ADB (Android Debug Bridge) drivers are needed because it will allow you to control your android device over USB from your laptop or desktop computer. Through this, you can copy files, install and uninstall apps, and do special functions that will unlock your Motorola phone.


You may delete this file from your computer at the end of this guide or after your phone is successfully unlocked. 

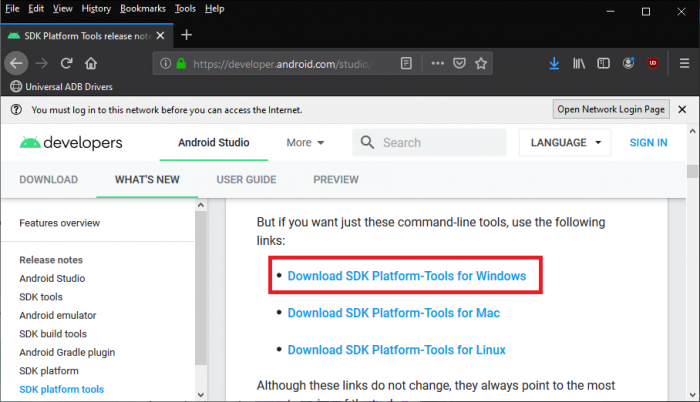
Step 2. Download the SDK Platform Tools from Android Developer’s website and extract the said file to your desktop so we can easily find it later. Note: SDK Platform Tools is needed here because it will allow you to perform functions available only for Android Developers. This will help you get into the “brain” of the phone and remove the sim lock from Verizon. 

You may delete this file from your computer at the end of this guide or after your phone is successfully unlocked. 

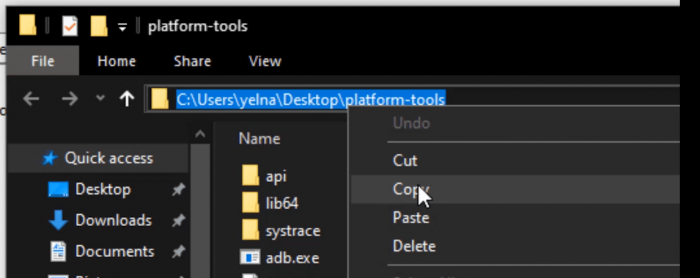
Step 3. Open the “platform-tools” folder, and then copy everything on its address bar.

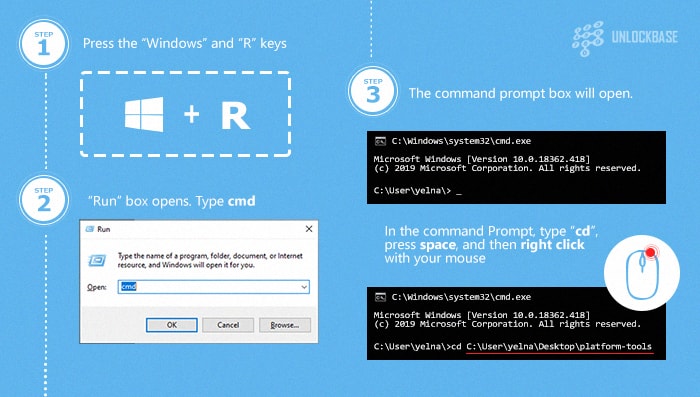
Step 4. Open the command prompt and type “cd” (without quotation marks), press space, and then right-click on your mouse

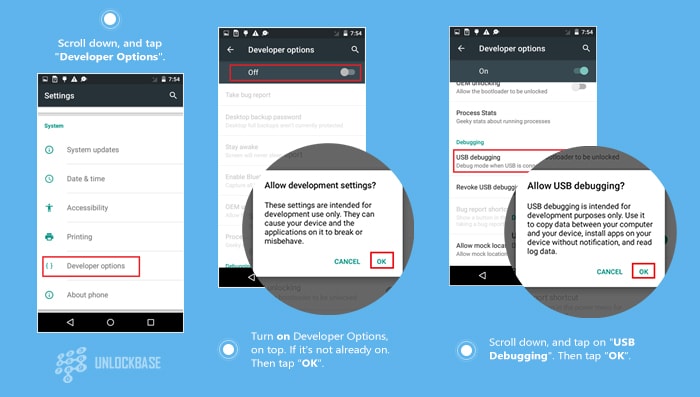
Step 5: Activate the Developer mode on the phone

Step 6. Allow USB Debugging on your phone.

Step 7: Connect your phone to the computer with a USB cord. Type the following codes on your command prompt in this order. Note: DO NOT include the quotation marks.

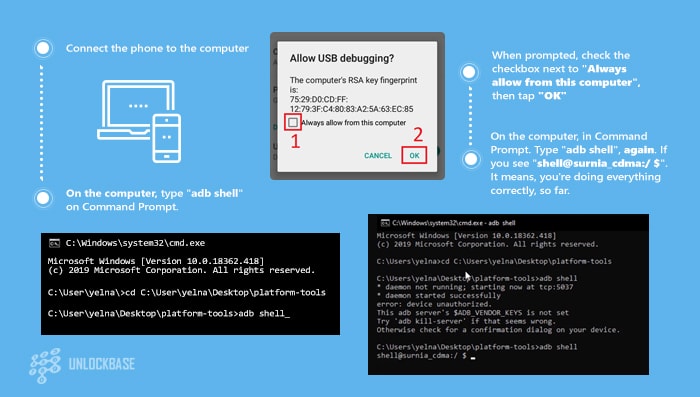
• “Adb shell” and press Enter. After this, you will see a prompt on your phone. Tap box for “Always allow from this computer”. 

• Type “adb shell”, again on your command prompt box (black box). If you see “shell@surnia_cdma:/ $”. It means you’re doing everything correctly, so far.

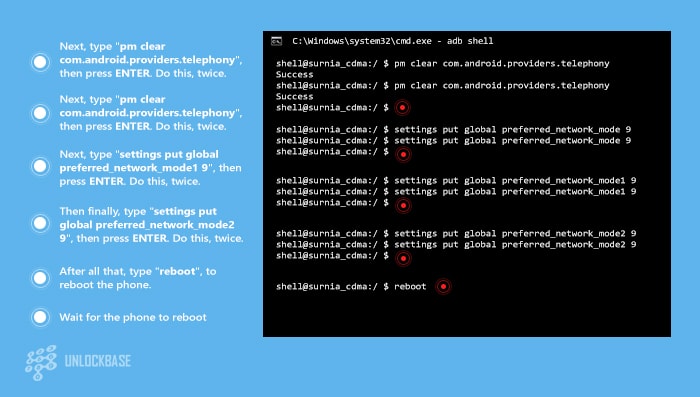
Step 8. Next, type the following codes in the command prompt box in this order. Note: DO NOT include the quotation marks.

• “pm clear com.android.providers.telephony”, then press ENTER on your keyboard. Do this, twice. 

• “settings put global preferred_network_mode 9”, then press ENTER. Do this, twice.

• “settings put global preferred_network_mode1 9”, then press ENTER. Do this, twice.

• “settings put global preferred_network_mode2 9”, then press ENTER. Do this, twice.

• “reboot”, to reboot the phone.

It should look like this.

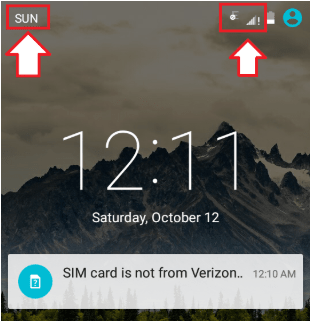
Step 9. Wait for the phone to reboot. If you see the network’s name on the upper left corner (and on the bottom of the screen), along with signal bars (upper right side). It worked!

On the other hand, if the phone says “No Service” repeat step 8. 

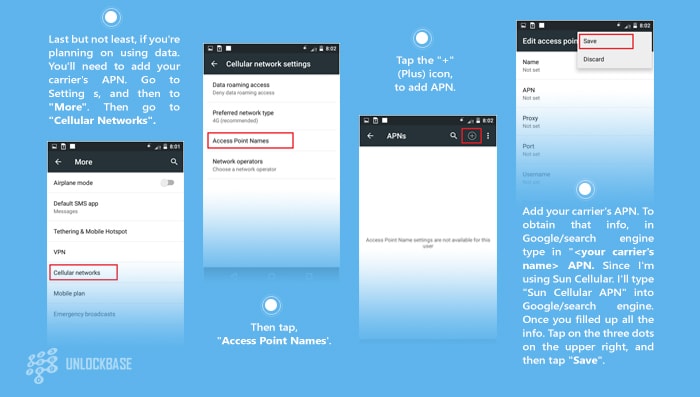
Step 10. Add your carrier’s APN. To obtain your APN’s info, click on the search bar and type your APN’s name. The example is using Sun Cellular so I typed “Sun Cellular APN”. Once you filled up all the info, tap on the three dots on the upper right, and then tap “Save”.

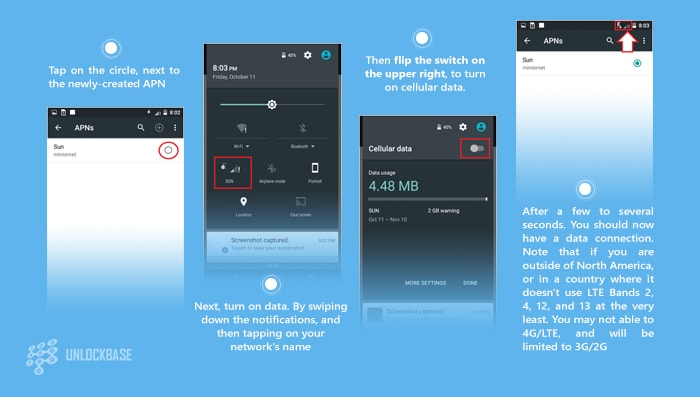
Step 11. Turn on your Data.

And that is the end of this guide! You may now disconnect your phone from your computer and remove all the files you have downloaded on your computer earlier.

If you’ve been able to successfully use another sim card using this guide, congratulations! 

Do you have a phone that you want to sim unlock from your carrier? Let us know how we can help! We have unlocked over 8 million phones worldwide and we have the fastest turnaround times, perfect if you’re traveling or in a hurry! 

If you think this guide has helped you immensely, return us the favor and share this with your friends or give us a shoutout on Facebook or Twitter! 

Got any questions? Comment it down below and let’s talk about it!


MORE INFO 


TL866II Plus VS Old Production

Tuesday, August 11, 2020 / No Comments


Please check the new upgrade record in the forum
Version: V10.05 --2020.3.26
1.ADD
  ISSI25xxx
  INTEL 28Fxxx TSOP48/TSOP56
  ISSI29GLxxxx TSOP48/TSOP56/BGA48/BGA64
  XGecu T56 Support:21482 pcs( +260 pcs)
  TL866II Plus Support:15918 pcss( +66 pcs)
2.Fix some known Bugs.


Version: V8.08 Support:15411--2018.10.30
ADD: ATF16LV8C ATF16LV8CZ ATF16LV8CEXT
SST26VF032B
FIXED: SST26VF064B
Version: V8.07 Support:15401--2018.10.23
ADD: ATF16V8C ATF16V8CZ ATF16V8CEXT
ATF22V10C ATF22V10C(UES) ATF22V10CEXT
ATF22V10CQ ATF22V10CQ(UES)
ATF22V10CQZ ATF22V10CQZ(UES)
ATF22V10CZ ATF22V10CZ(UES)
Version: V8.05 Support:15360--2018.10.20
ADD: ATF20V8B ATF20V8BL ATF20V8BQ ATF20V8BQL
ATF22V10B ATF22V10BL ATF22V10BQ ATF22V10BQL
next step: will add more PLD chips.
FIXED: GAL22V10B M95320W M95128W
VERSION: V8.02 Support:15315 --2018.10.16
FIXED: PIC16C54C algorithm.
Version: V8.01 Support:15315 --2018.10.9
FIXED: M48T58Y algorithm.
Version: V8.00 Support:15315 --2018.09.29
ADD: EC Controller KB9010/KB9012/KB9016/KB9018/KB9022
the software function be improved and the window size can be zoomed.
FIXED: some known BUG.
Version: V7.38 Support:15310 --2018.09.05
ADD:
ZB25VQ20/ZB25VQ40/ZB25VQ80/ZB25VQ16
/ZB25VQ32/ZB25VQ64/ZB25VQ128 ZB25LQ40/ZB25D40/ZB25D80/ZB25D16 M48T02/M48T08/M48T08Y/M48T12/M48T18/M48T35AY M48T35AV/M48T58/M48T58Y/M48T59/M48T59Y/M48T59V M48T128Y/M48T128V/M48T129Y/M48T129V/M48T512Y M48T512V/M48T513Y/M48T513V
Version: V7.35 Support:15237 --2018.08.23
FIXED: HEX files load
ADD: DS1265Y DS1265AB
PIC12F1822 PIC12LF1822 PIC16F1823 PIC16LF1823
PIC16F1824 PIC16LF1824 PIC16F1825 PIC16LF1825
PIC16F1826 @DIP18 PIC16F1826 @SOIC18 PIC16F1826 @SSOP20
PIC16LF1826 @DIP18 PIC16LF1826 @SOIC18 PIC16LF1826 @SSOP20
PIC16F1827 @DIP18 PIC16F1827 @SOIC18 PIC16F1827 @SSOP20
PIC16LF1827 @DIP18 PIC16LF1827 @SOIC18 PIC16LF1827 @SSOP20
PIC16F1828 PIC16LF1828 PIC16F1829 PIC16LF1829
Version: V7.32 Support:15188 --2018.07.17
ADD: MB85R256H
BQ4010YMA/BQ4011YMA/BQ4013YMA/BQ4014YMA/BQ4015YMA
BQ4011LYMA/BQ4013LYMA/BQ4014LYMA/BQ4015LYMA
FIXED: DS1245/DS1250 Algorithm(read and write)
Version: V7.30 Support:15169 --2018.06.29
ADD: GD25Q32C/64C/127C/128C OTP Security Registers programming
LH28F640BFE-PT LH28F640BFE-PB TC58NVG0S3ETA00
FIXED: W25QXX Read OTP Security Registers Algorithm
Version: V7.22 Support:15156 --2018.06.04
FIXED: M27C801 Algorithm
ADD Spanish menu supported
Version: V7.21 Support:15156 --2018.05.15
FIXED: S25FL256S /512S PIC16C71 / AT29C256 PINDetect
ADD chips: PIC16F87/88 SOIC20
Version: V7.11 Support:15144 --2018.04.17
ADD: GD25B32 SO8_SOP16/GD25B64 SO8_SOP16
Fix:DS1220(RW) Algorithm
Version: V7.10 Support:15138 --2018.04.8
German Supported
Fix:S24S45 @SOP8 MX25L6445E Algorithm
Version: V7.08 Support:15138 --2018.03.29
ADD:S25FL256S @SOIC8 S25FL256S @SOIC16
Russian Supported
Fix:MX25L12845E @SOP16 Algorithm
Version: V7.07 Support:15130 --2018.03.17
ADD: IC to 15130
Fix:SST39LF/VFxxxx TSOP48 Pin Detect function
Fix:Some 25 serials auto selection
Version: V7.05 Support:15118 --2018.03.01
Add English instruction
Version: V7.03 Support:15118 --2018.02.26
TL866II Plus Release First.

****************************************

TL866A/CS Application Software( V6.85 ) Download

Download TL866 Application software
(Old Hardware)


**********************************************